Sunday, May 24, 2020

Bible Journaling 101 part4?

Sometimes it is so hard for me to keep up with this blog on journaling but I'll continue to try. It makes it hard when you have limited data to use....so on with the tutorial.
************
I had this old old set of 1920 Encyclopedias that had been in storage. They were pretty rank looking and had water spots and pages were really aged. I looked up to see if they were worth the effort to sell them as a collectible set and they were worth maybe $20 if I sold them. Instead I turned them into blessings. 
First thing I did was to remove the cover from the pages. I did save some of the pages to use in these and other projects. The illustrations were all in black and white so it makes unique junk journal pages. Once I had the covers removed, I painted the covers. I had to paint them with several coats of paint as the red color of the fabric kept bleeding through. On some I wanted pink I only did one coat of white and left them looking pinkish. I did a survey with most of the ladies at church and one was their favorite color so tried to match them to the person I was doing them for. I did mine blue. 
As you can see it is over stuffed. After painting blue, I glued on laces, doilys and anything to decorate the cover. I used a round clipart I dound of the butterflies. Also there is a metal charm glued on. 
I then took scrapbooking paper and also cardstock to make the pages. I cut most to the page size to fit inside the book. I drilled holes in the cover so I could attach the pages. The pages are all punched at same spacing as the cover. I tie it altogether when finished with ribbon or I used soft netting for mine. I also glued in a strip of the netting on the inside of the cover on front and back and glued a cardstock sheet over to seal it in. These are used to tie the book closed when I'm not using it. The pages are all sewn together as some scrapbook paper or cardstock is blank on one side and I wanted printed look to all mine. 


One of the highlights of my life was going to Israel. It was a trip of a lifetime. I found some old junk mail I had saved that had this neat map. The other is a print from an artist I like. 
This shows a photo of me being baptized in the Jordan River. I also love Mary Englebrit. The right page was from a calendar of hers. 
As you can see these pages have holes punched on the side. The page on the left has a scripture clipart I found online. The dress is a cute clipart I found for free online. It folded in half so I can write inside the dress. I attached it with tying ribbon or embroider floss to a hole punched at top. The page on the right is a pocket and a journal box at the top. I tuck in tags I've cut from scrap paper and tie a ribbon or floss in a hole punched at top. I usually attach 2 tags together to make a tiny tag book. It gives space to write my thoughts. 
Another pocket. The thing with the button is a craft stick with lace glued to back, button on top front and ribbon. It is supposed to be an angel. 
If you click on the photo and enlarge it you can see that I sewed alot of the clipart and pages together. The pockets are all sewn on each page. 
This is one of my favorite pages. I love all the vintage looking paperdolls you can find on the internet. I found this cute body builder and it was to make a jumping jack using brads. I had to reduce the size to fit the book so it was too small for brads so I just glued the arms and legs on the body. I did tie him so he dangles in the book. If you click to enlarge you can see the decorative stitching I used to sew the page together and the straight stitch for the pocket. I also used wallpaper from old wallpaper books I had. 
The picture was one I took from Facebook. The leaves are charms or buttons I glue in. The moon was an old piece of costume jewelry. You can see the journal page I glued in to write my thought. 
The hand was another vintage card I found online. I printed on cardstock and cut around the thumb to hold a scripture card. The right page has more charms and buttons. 
Of course I had to add a couple of pages on tea. The angel was a pattern I printed onto scrapbook paper. I only glued the center and folded the wings to make it look 3D. 

Another paper doll dress I had from a Mary Englebrit book. I used the top tabs to fold over a tiny coat hanger I made from a paper clip. Some of the pockets I folded with a tuck before sewing in to give more room in the pocket. 
I folded a paper lunch sack and used it for the center of the book. I did glue on clipart to decorate. The paper sack is open on the right side to allow space to tuck in photos or things I might want to keep. 
The folded paper sack is the very center of the book. You can see where I ran the lacy netting through the center to hold the book together. I tie a bow on the center of the back of the book. 
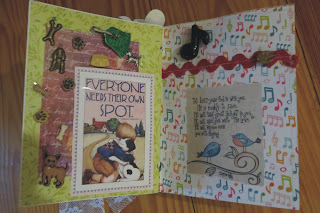
I sewed in rickrack and glued in charms around the clipart. 
The tag in the pocket has a charm tied to the top to make the it easier to pull the tag out. 
**********
This is about all I've done in this book. There are several more pages but they are similar to what's shown. 
Next I show my newest journal and share a little of it. 
And as always. 


Wednesday, May 20, 2020

Bible Journaling101 part4

I found a wonderful free Bible Study on the book of James. At this time, our church was doing a Wednesday night study on the same book. It is so wonderful how God directs our paths to the same things in life with other Christians.
 Anyway this study had lots of cute cut outs and little tiny books that I cut out and glued into my notebook. Today, I'm sharing some of the photos taken from my study.

Again I used the coloring pages I had scanned from my Inspire Bible. This Scripture list was one that was shared online by a Bible Journaling group I'm in.

The white looking Arrow at bottom that says "Joy in our Trials" was one of the cute clip-art books I cut out and glued in. The colomn strip and other clip-art was found on Google Images

The left side is more clip-art found online and left was part of the Bible Study on James that I printed and then added clip-art.


There were more pages on my study of James but think you're probably bored by now. Most are about the same. If you look closely at some of the photos by clicking on them, you can see some of the little books I added to go along with the study. 
***************
Since then, I've done a study on Ezekiel and have not gotten in put into the notebook. I just started a study on BibleJournalLove (click on to access some Bible courses. Some are free). The free one I'm working on is the Parables of Jesus and she has free clipart to go along with the study. She also has a couple of groups on Facebook. I did an earlier one with her on Psalm 119. I did Psalm 119 in my Journaling Bible. 
************
Tomorrow I will show you a cute altered book I made into a journal. I made up about 26 and gave to the ladies in our church one year for Christmas. 
************
And as always......

Tuesday, May 19, 2020

Journaling 101 part3

Today's showing is my artist drawing book. I had started this years ago and had glued in some sayings and things I wanted to save. I decoupaged the cover then, not realizing I would be using it for my study in Ecclesiastes but somehow God worked in a way that it all tied together. I still have lots of room in the book to add to it as I do other studies. By the way, Ecclesiastes is one of my favorite Old Testament books. 
This is the cover. (click on photos to enlarge)
I decoupaged a page from an old encyclopedia. (Later on I will show you what I did with the old books that were too old to salvage)
I added clip art sayings and then smudged things with ink pads.
You just take the ink pad that is pre-inked and rub it across or dab it. You can use a dry brush technique using water based paints the same way, The first layer was just torn paper from tissue to used coffee filters. This give an aged effect.
*************
First page....

I used water color pencils for the sunburst effect and basically colored in the colors and then dabbed with a damp brush to add strokes fanning out. I used a scanned copy from the Inspire Bible for the title page for Ecclesiastes. I cut out and glued to bottom of water color picture. I wrote out a verse in Ecclesiastes 1 at the top. 

The printed sayings and Scriptures were the ones I added years ago that went along with my study. I glued in clip art and washi tap. The vertical strip on the left is a tip in. There are lots of these type scripture strips online just made to fit the jounaling Bible sides. The tip in is taped using washi tape. Washi tape can be found in any scrapbooking aisle. I find mine at Walmarts, Michaels and Hobby Lobby. There are a lot online as well. 
 These next 2 photos are from a study on Ezekiel. I dry brushed red and blue streaks across the left page and wrote out my Scripture and then glued in clipart around it. I found these cute kits on DaySpring (they no longer carry them) and bought a few on sale. I love them as they have the clip art already cut for you and you only have to glue it in. 
The right side shows Scripture I typed and glued in along with pictures I got from Google Images. I have Corel and can put several photos onto one page so I compiled them and then printed to the tissue paper and glued in using ModgePodge.
On my study of Ezekiel, instead of writing out the Scriptures each time, I added some but mainly just wrote out my thoughts on the Scriptures I was studying at the time. I added the Google Image photos as clip art. The arrow is from colored paper that I cut with a die in my Sizzix machine. The arrows are terrific for pointing out a picture of thoughts I might want as a reminder later on. 
*****************
This is a new lesson showing a yearly planner journal I used instead of as a planner. I love this one and not even sure where I got it. I may have ordered it online or someone gave to me as a gift. 
But this is the cover. 
It came with some cute Bible coloring pages. I love this one as it is a small ring binder and I can punch holes in my own paper or cardstock to add to it as I go along. I basically use this one and another as my main journals. I can take out some sections as it gets too full and then just bind these sections separately as I go along. 


You can see from the above photo that this was a monthly section from the planner. I just glued and wrote over it adding some of the techniques I have shown. Since I began journaling, I have since bought white sticker paper that is plain. They also have clear. I can combine my prints using Corel and then print onto the sticker paper and cut out and have my own sticker. It eliminates having to use glue all the time. I bought my pretty cheap on Amazon in a 100 page pack. 
I added tip-ins and tags. 

This was using a column page from the planner. The word complete was a bought package of letter stickers. The pumpkin looking thing on the top left side is supposed to be an onion. You can see my drawing is not that good but doing journaling is for me to enjoy and learn from my studies not for perfection.
The butterfly is another pattern paper cut with my Szzix.


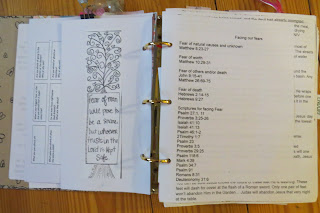
This is printed cardstock I bought that I punched holes and added. The right side has a narrow cardstock strip added with t Scripture column strip I glued on. It is like another narrow paged added. 
Sometimes to reinforce a lesson, I type out my thoughts and also some of the reading on the lesson itself and then print on plain printer paper and punch holes and add to the notebook.
I add little treasures to the notebook using an envelope cut down to size and punch holes and add to binder. I also add 3D objects by punching hole in one of the card stock pages I've already added and tie on object with ribbon. I label the envelope with Scripture link. 
****************


Just around the homestead

It's amazing how much can change in a few years. And seems time speeds up as you age. I promised to put up photos of the beginning of o...